Import OST to Office 365 with Emails and Attachments
Migrating to Office 365 requires proper planning and management. The process of migration need an effective solution. Here, we will tell you the complete procedure to import OST file to Office 365 in multiple ways.
Let us know the causes which tend users to move OST files to Office 365 environment.
Get Professional OST to Office 365 Importer
Import your OST files to Office 365 account safely and efficiently
Reasons to upload OST to Office 365
- Exchange crash and want a reliable platform
- Instant access of OST data in safe environment after sudden deletion
- To avoid big Exchange maintenance downtime
- Organization shift allows to move to Office 365
How to upload OST mailboxes into Office 365 account?
If you look for manual ways then no direct method is available to migrate OST to Office 365. However, you can convert OST file to PST format and then upload them to Office 365. Users have option of third-party tools help users to migrate OST mailboxes to Office 365 account in a straight-forward manner.
- Convert OST file to PST format and upload to Office 365
- Import OST emails to Office 365 directly with third-party tools
Method 1. Upload to Office 365 by converting OST files to PST
This is an indirect way to upload OST files into Office 365. First, convert OST files to PST format and then upload it to Office 365.
- Step 1. Convert OST data file to PST
- Step 2. Import PST file to Office 365
Step 1. Convert OST file to PST format
There are multiple ways for this conversion –
- Create new PST and copy OST items
- Use Archive feature of Outlook
- Export feature of Outlook
- Third-party OST to PST Converter
Create new PST and copy OST items
- Open Outlook application
- Create a new PST in MS Outlook
- Pick desired data from OST file, copy it and paste in to newly created PST file.
Export Feature of MS Outlook
- Start MS Outlook and Go to Export option from the File tab
- Select Export the file and Hit Next
- Select Personal Storage Table and press Next
- Choose folders and subfolders that you want to export
- Provide location to save the exported file and click Finish to complete the process
Note: This method is applicable when user account is connected to Microsoft Exchange Server.
Step 2. Upload PST file to Office 365 cloud
Users have two different options to upload PST file data into Office 365 –
- Upload to Office 365 with Azure AzCopy
- Use Driving Shipping method
Upload using Azure AzCopy
You can directly upload PST files into Office 365 using AzCopy.
- Download and Install Azure AzCopy and copy SAS URL (to provide the required permission to migrate PST file to Azure)
- Upload PST files into Office 365
- Create PST Mapping (CSV) file
- To import the file, create import job in O365 account
- Select the data that you want to import and then start the task
Drive shipping for PST to Office 365 Import
Drive Shipping method helps users to import PST data into Office 365. For this, copy PST file data to a hard disk and send it to Microsoft. Microsoft will itself upload the data to cloud.
Method 2. Import OST files to Office 365 directly with third-party tool
You have seen that using manual methods importing OST files into Office 365 is not easy and especially for a non-technical user. Therefore, professionals recommended third-party tools for direct and rapid migration. Download GainTools Cloud Importer, a direct solution convenient for all users to upload OST to Office 365 account.
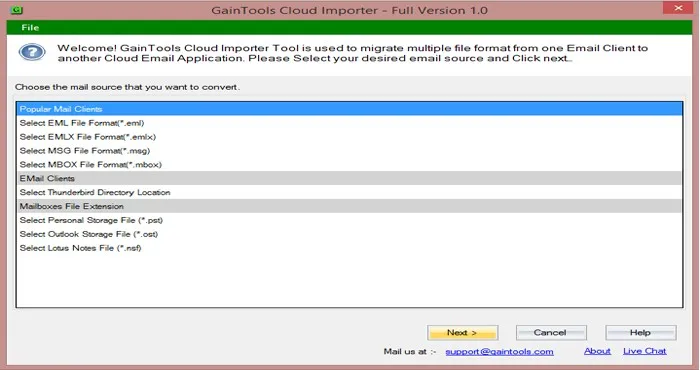
Steps to import OST directly to Office 365
- Download the software and launch it by double-click on the software icon.
- Select OST file format. Then add OST file by selecting File or Folder mode. After that, click Next to move ahead.
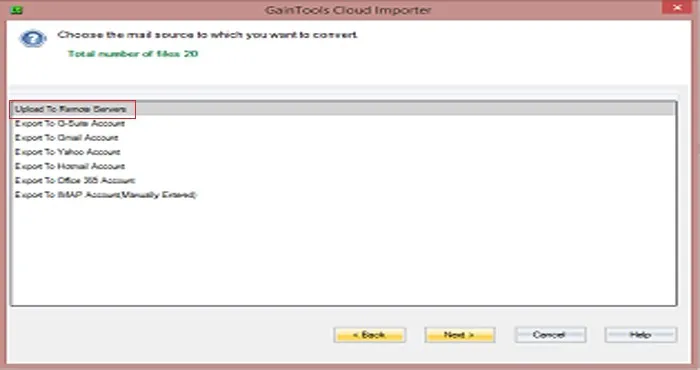
- Under Remote Servers, select Export to Office 365 account and press Next button.
- Mention username and password of Office 365 account in the required fields. Then, click on Authenticate User button and this successfully connect with Office 365 account.

- Now, select a folder for uploading OST files. Select an already created folder of Office 365 account or create a new folder.
- This is the last and final step. Move the mouse pointer to Upload Now button. This will commence the migration process and you can see the live data migration.
Once it is completed, you can simply open your Office 365 account and find the imported OST files.
Conclusion
I believe you have got an appropriate solution to import OST mailboxes to Office 365. We have explained two different ways for the migration. If users have a less data and he/she is technically sound then use any method otherwise, we strongly recommend for the third-party app because it offers direct migration and only a few simple steps that are easy to follow by all users.
You will certainly get satisfactory results with third-party software. It comes with bulk data migration facility and by just loading OST file and entering Office 365 login details, the migration of OST to Office 365 gets simply completed. You can try out the trial edition before applying for it.
Ready to Import Your OST Files to Office 365?
Don't let OST limitations hold you back. Get professional OST to Office 365 importer tool today!